
Mastering Churn Prediction with Azure Auto ML: A No-Code Tutorial
Mastering Churn Prediction with Azure Auto ML
In today’s fast-paced business landscape, retaining existing customers is often more cost-effective and beneficial than attracting new ones. For banks and financial institutions, understanding what drives a customer’s decision to leave can be a game-changer when crafting retention strategies and loyalty programs. This is where churn prediction steps in—a powerful tool enabling companies to spot customers at risk of leaving and take proactive measures to keep them engaged.
In this tutorial, we’re about to embark on a journey into the world of churn prediction using the intuitive, no-code approach offered by Azure Machine Learning’s Automated ML within the Azure Machine Learning studio. Our mission is clear: we’re here to train a classification model capable of predicting whether a client is likely to stay or leave their bank.
What makes this endeavour especially exciting is the use of automated ML. With this technology, you’ll have a virtual data scientist at your disposal, swiftly exploring countless algorithm and hyperparameter combinations to help you discover the best model, all according to a success metric of your choosing.
The best part? You won’t need to write a single line of code. Instead, you’ll harness the power of an intuitive studio interface to perform your training tasks. By the end of this tutorial, you’ll have learned how to:
- Create an Azure Machine Learning Workspace: Lay the foundation for your machine learning experiments.
- Run an Automated Machine Learning Experiment: Let the magic of automation guide you to potential models.
- Explore Model Details: Gain insight into what makes your model tick.
- Deploy the Recommended Model: Transform insights into actionable solutions.
Project Background: Predicting Customer Churn in Banking
Our challenge is to develop a machine learning model capable of forecasting customer churn—when customers decide to part ways with their bank. Essentially, we want to estimate whether a bank’s customers are likely to remain loyal or leave. Let’s dive into some specifics about our dataset:\
Dataset Story:
Size:
Our dataset comprises 10,000 observations with 12 distinct variables.
Independence and Dependence:
The independent variables provide valuable insights about the customers, while the dependent variable is the key indicator of customer abandonment.
Features:
Here are the features we’ll be working with:
- Surname: The customer’s surname.
- CreditScore: The customer’s credit score.
- Geography: The customer’s country (Germany, France, or Spain).
- Gender: The customer’s gender (Female or Male).
- Age: The customer’s age.
- Tenure: How many years the customer has been with the bank.
- Balance: The customer’s account balance.
- NumOfProducts: The number of bank products the customer uses.
- HasCrCard: The customer’s credit card status (0 = No, 1 = Yes).
- IsActiveMember: The customer’s active membership status (0 = No, 1 = Yes).
- EstimatedSalary: The customer’s estimated salary.
- Exited: The critical variable—whether the customer abandoned the bank (0 = No, 1 = Yes).
In the chapters to come, we’ll embark on an exciting journey of exploration and discovery, leveraging the power of automated machine learning to predict customer churn and ensure our bank’s valued clients stay right where they belong—with us.
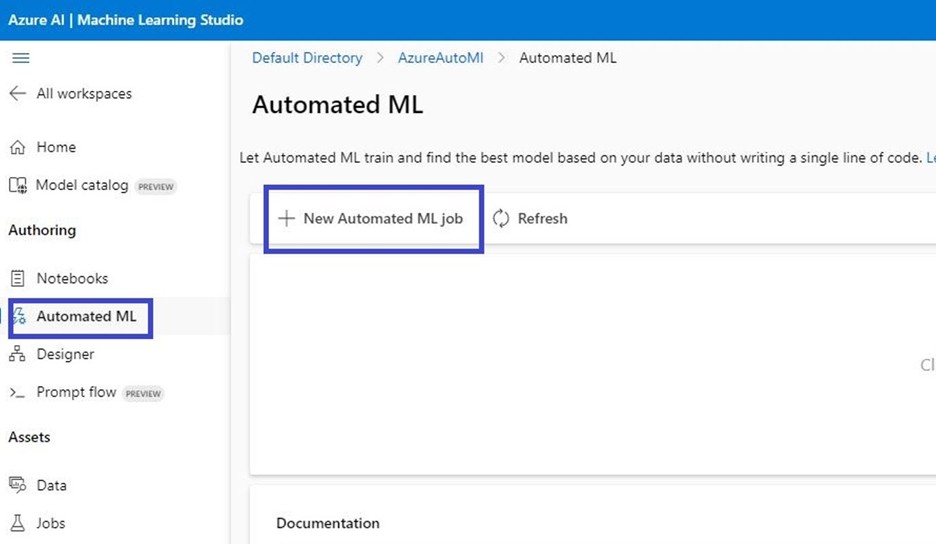
1. Creating an Automated Machine Learning Job
- Log in to the Azure portal.
- Open Azure Machine Learning Studio and in the left pane, select Automated MLunder the Authoring section
- Since this is your first automated ML experiment, you’ll see an empty list and links to documentation.
- Select +New automated ML job.
2. Create and Load a Dataset as a Data Asset
Create a New Data Asset: Begin by selecting “From local files” from the “+Create data asset” drop-down.
- Fill in basic information for your data asset and choose the dataset type as TabularDatasets (the default).
- Select “Next” on the bottom left.
- Choose the default datastore, Azure Blob Storage, for uploading your data file to your workspace.
- Upload the “bank_customers_churn.csv” file from your local computer.
- Select “Next” to upload it to the default container created during your workspace setup.
- Once the upload is complete, the Settings and preview form will be pre-populated based on the file type.
- Verify that your data is correctly formatted via the Schema form.
3. Configure the Job
After loading and configuring your data, it’s time to set up your experiment. This includes tasks like selecting your compute environment size and specifying the column to predict.
- Select the Create New Radio Button.
- Configure the Job:
- Enter the experiment name as “bank_churn_experiment.”
- Choose “y” as the target column—what you want to predict.
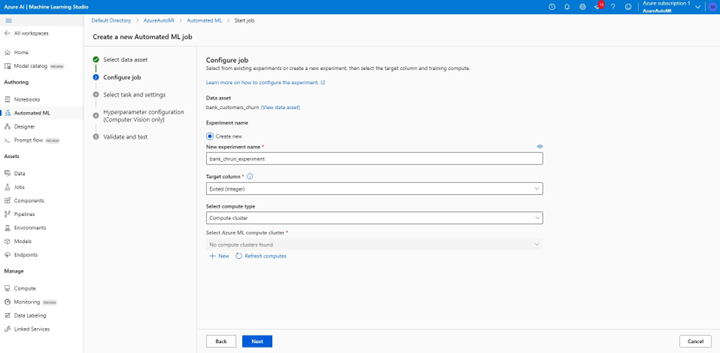
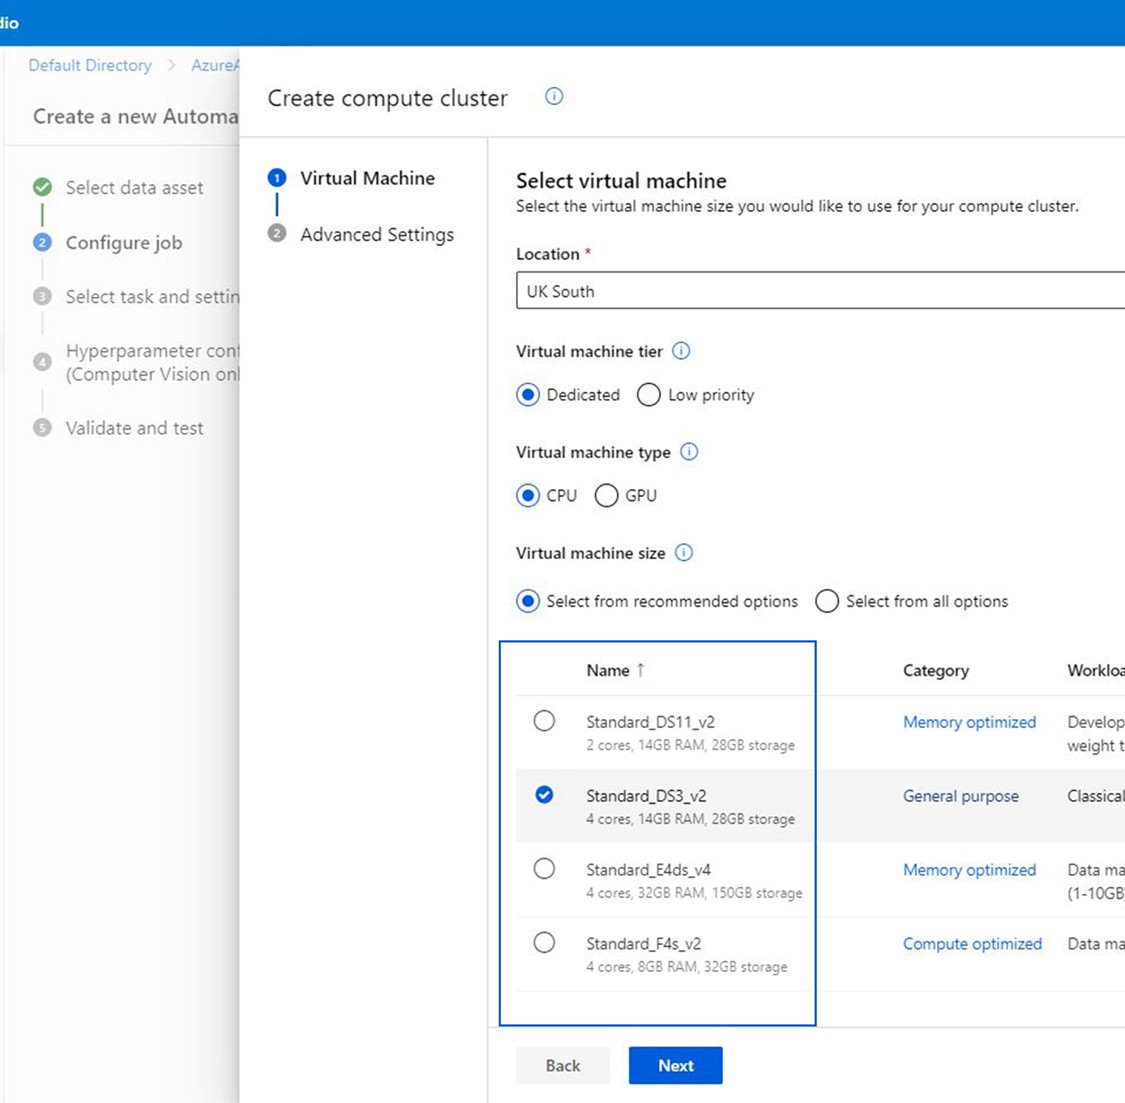
- Select “compute cluster” as your compute type.
- Proceed to the next step.
4. Specify Machine Learning Task Type and Configuration Settings:
- Choose “Classification” as the machine learning task type.
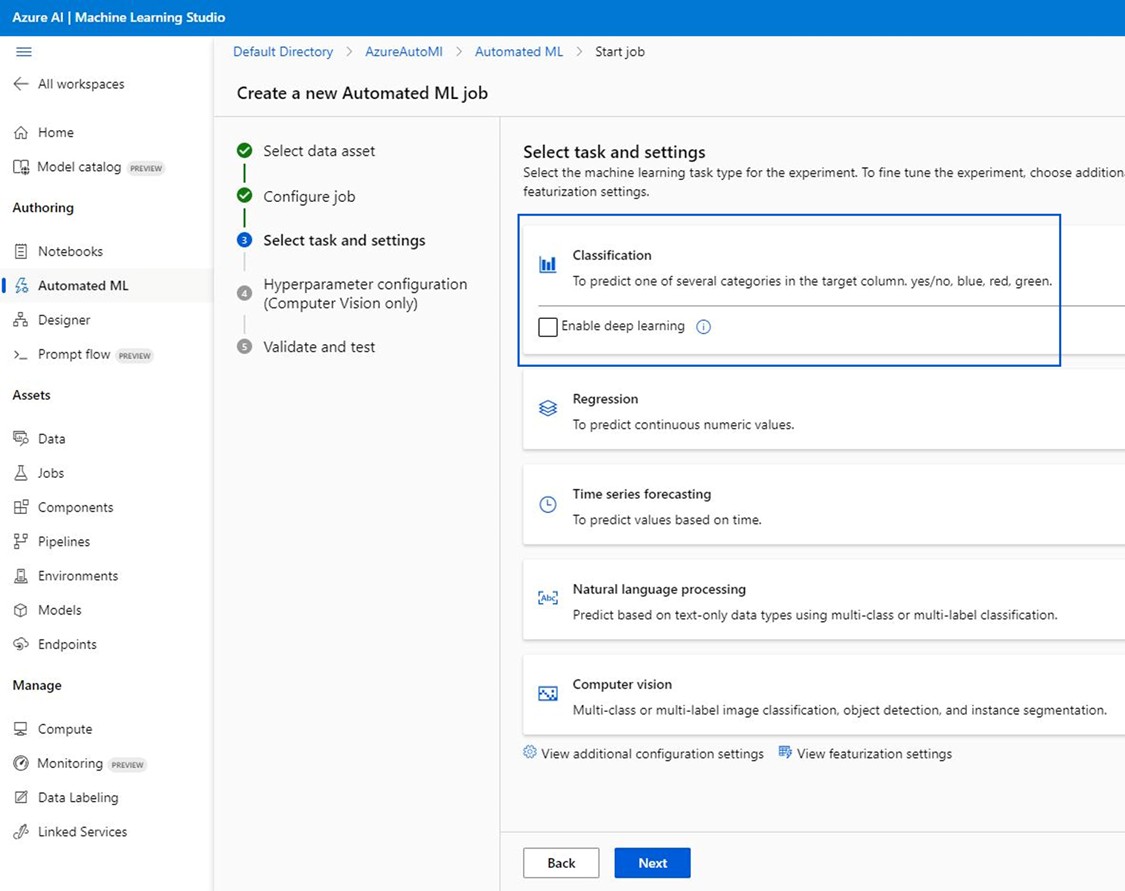
- View additional configuration settings and configure them to your liking. In this tutorial, we’ll use “AUC_weighted” as the primary evaluation metric.
- Save your settings and proceed.
5. Validation and Testing:
- You can make a selection in the Validate and test form or use the default 100 percent.
- Select “Finish” to run the experiment.
Explore the Model
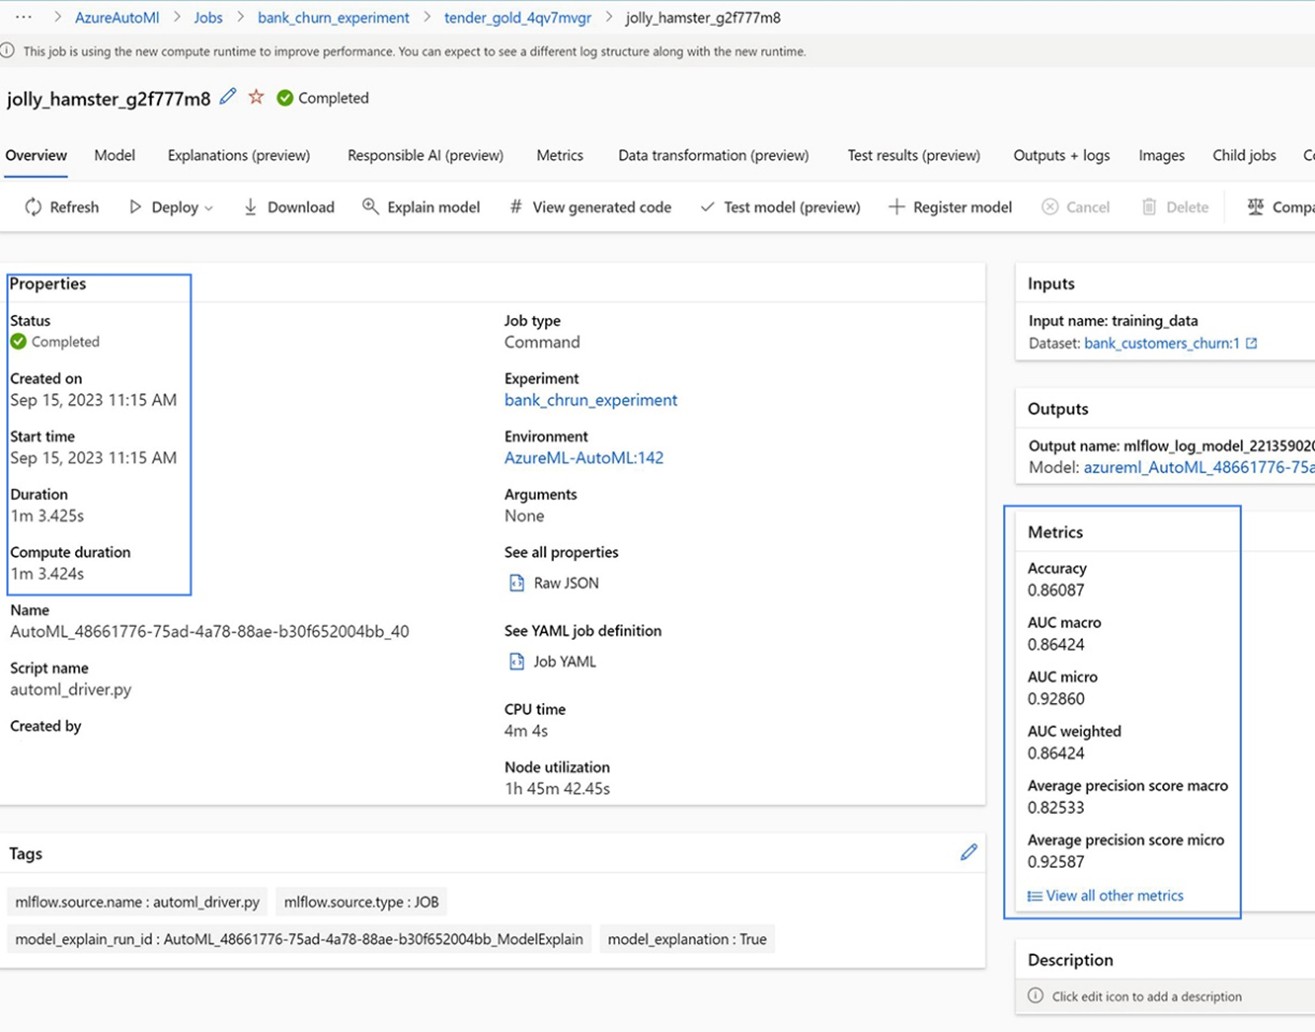
Once your model is marked with a status of “Completed,” you can start exploring its features, explanations, and performance statistics. By default, models are ordered by their metric scores, and you can select the model with the highest AUC_weighted result. In our case, we have the “jolly_hamster” model.
In the metrics section, you can see the accuracy of the model.
Understanding Models Better
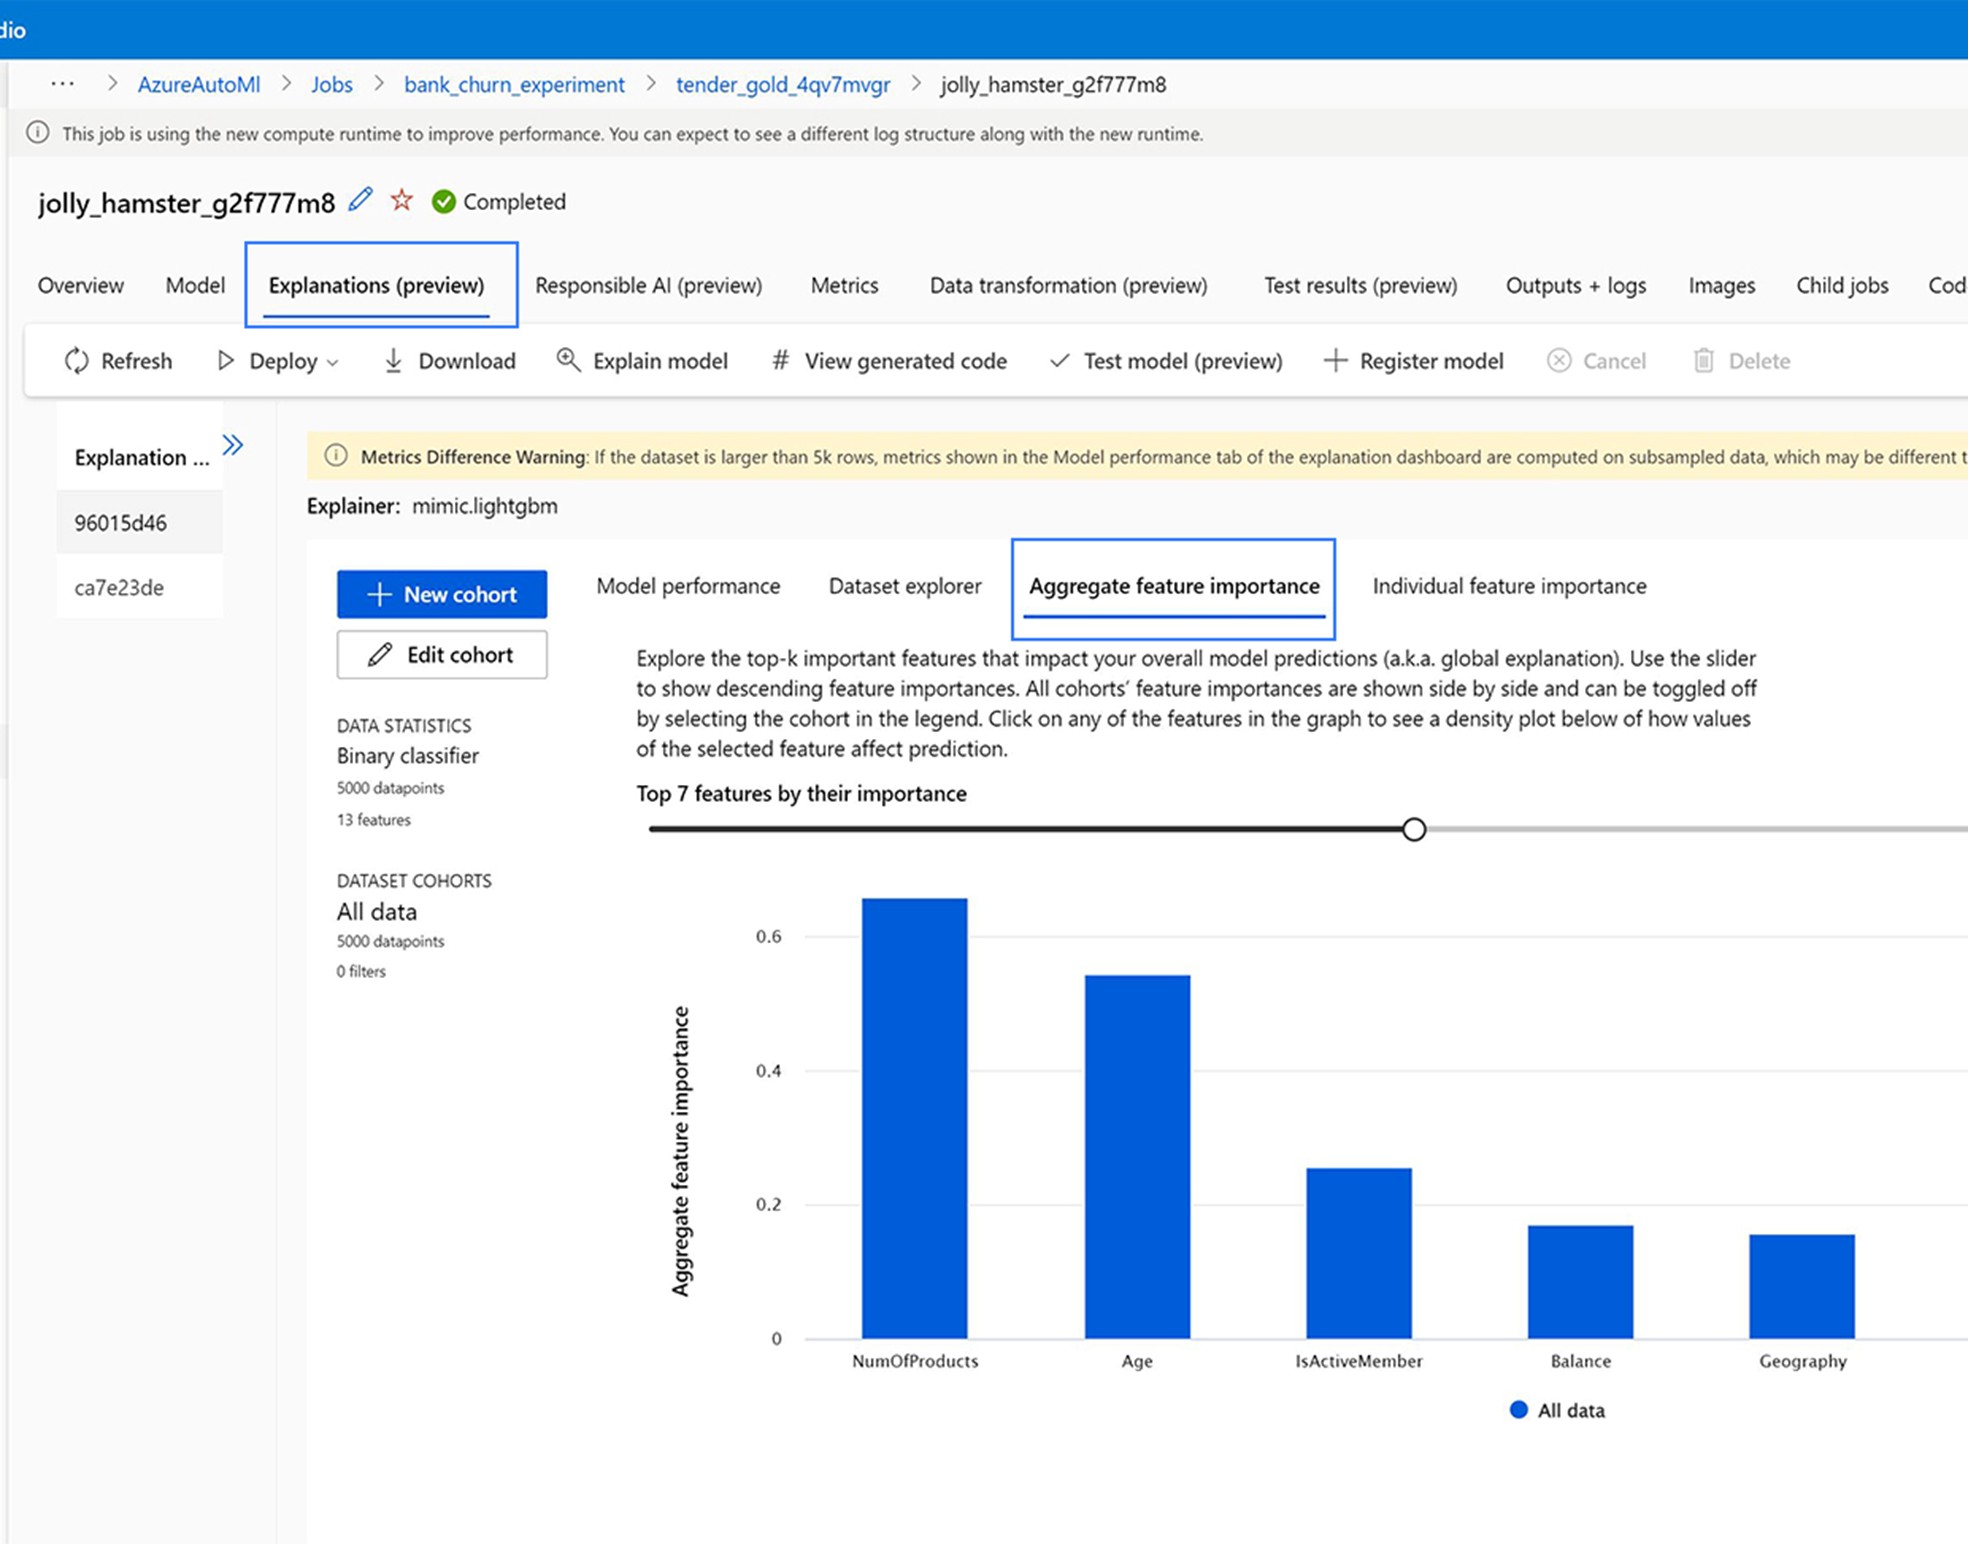
To gain a deeper understanding of your models and compare their performance, leverage the built-in support for experiment run summaries and detailed metrics visualizations. Use the Explanations tab to quickly review the most important features in your model and assess feature importance. It’s your path to evaluating ML model fit for both raw and engineered features.
Stay tuned as we uncover more important Azure features in the following blog posts. In the end, you’ll be equipped with the knowledge and tools to make data-driven decisions that keep generating value for you and your customers.