Both Power Apps and Power Automate exist within the Office 365 suite and bring enormous amounts of possibilities to mildly technical business users. No longer will Dan in IT who knows a bit of VBA be hassled to write a dodgy macro that puts some data in a database. Not only that, business users can now reach out to literally hundreds of other services that come connected straight out of the box! In this blog, I’m going to demonstrate a way we can use PowerApps to put a professional and mobile ready interface onto a Flow, allowing us to query an API and present the results back using Power BI.
Creating a PowerApp
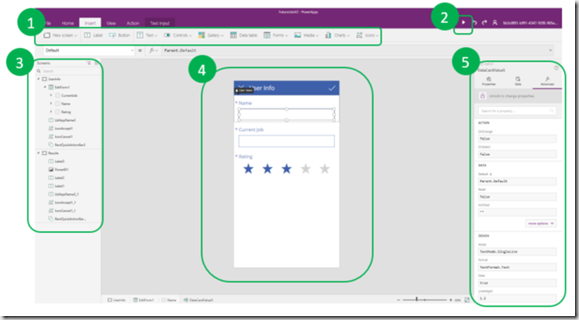
You can create a PowerApp in either the Web Portal or using PowerApps Studio (https://powerapps.microsoft.com/en-us/downloads/). I personally prefer to use Studio but both work the same, and actually all connections, Flows and custom APIs are managed through a web portal. If you have ever developed with Windows Forms then PowerApps will feel very comfortable. There isn’t a toolbox as such but you can easily drag and drop controls from the ribbon bar and all the properties live on the right-hand side. It also holds some similarities with Apples xCode in the sense that you can see all your Screens (Scenes in xCode) on the left.
1. Ribbon Bar: Here you can drag and drop a wide range of controls, galleries and media APIs onto the App design screen
2. Preview App: This button will run your App/debug. You can also use F5
3. Screen Viewer: Here you can see all the screens that make up your App
4. App Design Surface
5. Properties Window: Configure properties about the controls within your App
The Common Data Service
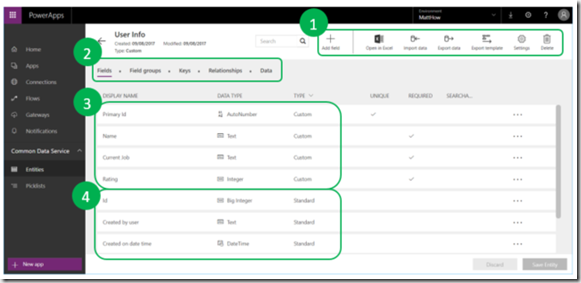
Because we are looking at this from an Office 365 perspective we can make use of the Common Data Service, but we could also choose from any other relational data store including Oracle, MySql, SQL Server, SharePoint etc. As it says on the tin, the CDS is a generic, cloud hosted database that gives users the ability to create their own datastores and then share those throughout the organisation using AD. It also integrates very nicely with PowerApps and Flow meaning we can avoid any SQL DDL or Stored Procedures. Out of the box you get a range of standard tables that cover off a variety of business needs but you can also create custom entities that can tailor the CDS to your specific needs. Here’s an example of an entity I created in CDS to use as the main datastore for my App.
1. Ribbon Bar: New fields, Import/Export, Settings and Delete
2. Tab Bar: Fields and Keys. Preview Data within table
3. Custom Fields: Showing data types, Nullability and Cardinality
4. Standard Fields: Audit fields e.g. Created by / Created on
Developing a Power App
One of the best features of Power Apps is that it is very smart with metadata, we simply need to point it at a table and Power Apps can use that to make decisions on how to construct your App in a way that suits the C.R.U.D. needs of your datastore. By creating the app from the custom CDS entity, Power Apps will know that you need a browse screen, a details screen and a new/edit record screen. Better yet, PowerApps will create and populate a form control with all of the custom fields ready to be populated. Based on the fields configuration it can auto create mandatory flags, error handling and hint text.
You may question whether Power Apps has some limitations due to not having a code editor, whilst I’m sure some will find this to be true, I am yet to be disappointed. Instead of code, Power Apps uses Excel like functions and context variables which will feel very intuitive to any excel user. Context variables get stored at App level and can be called and updated from anywhere within your App.
When creating the App, you can choose from a range of controls including Power BI tiles, Star Ratings, PDF viewers, Import/Export, the list goes on. Additionally, the gallery options mean you can display data or images in a real variety of ways. Above all that though is the integration with the devices media capabilities that make Power Apps a really cool product for non-coders. With PowerApps you can take and save pictures, Play and record video/audio and even scan barcodes.
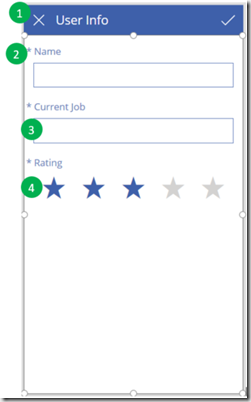
I’ve made a few basic changes to my App that you can see below but even if you hit F5 and previewed your app straight after creating it, you could successfully view, edit and input data to the database. So far I have written no code and Dan in IT is now free to go back to work.
1. Quick Actions: PowerApps has automatically created these quick actions to submit or close the form
2. Mandatory Indicator: Depending on the “Required” Property in the CDS
3. Text Box: In New mode will be blank, In Edit mode will show data. Can also show hint text and error messages if input is invalid.
4. Star Rating Control: I swapped a standard integer input with a star rating to make the App more user friendly.
Creating a Flow
By default a newly built app is configured to write data back to the datastore by using a SubmitForm() function. These functions are handy for a lot of things as they take care of resetting the form after submission but also setting the form to Edit or New mode. If we want to do anything more than this – avoiding code – then we need to start looking at Flow. Flow can do an awful lot – just look at the pre-built templates for some ideas, but I’m going to use it to call the Glassdoor API to get job progression information.
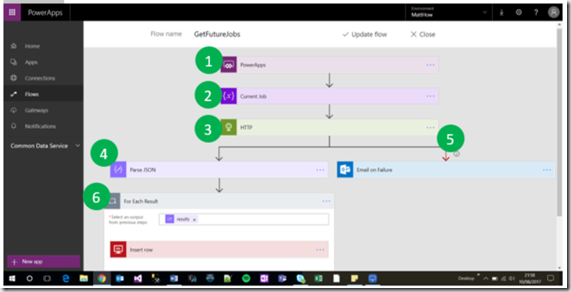
To create a Flow, you need to start with a trigger. The same goes for Logic Apps only, with Flow, you can trigger the process from a button press within your PowerApp. From then on you can create either actions, loops, branches, conditional logic and constraints in order to connect up any number of systems.
1. Trigger: Trigger point that is called from PowerApps
2. Initialize Variable: Passes a parameter from PowerApps into a variable to be used within the Flow
3. HTTP: Uses HTTP GET method to call the Glassdoor Job Progression API
4. Parse JSON: Parses the JSON response from Glassdoor and provides results in the form of variables
5. Email on Failure: By using the Run After feature I have configured an email notification if the Glassdoor API call fails
6. For Each Loop: Iterates over the JSON results and writes each set of variables to the database. At the moment I am using SQL so I can feed Power BI, the PowerApps team are working on deploying the CDS connector for Power BI to the UK in the coming months
The formula that is used to call the Flow from Power Apps look like this:
GetFutureJobs.Run(Occupation); Navigate(Results, ScreenTransition.None, {CurrentJob: Occupation})
In here there are 2 functions. The first (GetFutureJobs.Run(Occupation)) is the function to execute a Flow. Anything within the brackets will be passed into the Flow and can be used at any point within your process. In this case I pass in the users current job and use that to search Glassdoor for potential next jobs.
Next is the Navigate function. This is a common occurrence in PowerApps and is used to take the user to the results screen. The first parameter is the target screen, Results. The second tells PowerApps how to transition between screens and the final array (the bit between these {}) is a list of parameters that can be passed into the next screen.
Implementing a Power BI tile
The final step for my App is to analyse the results from Glassdoor using a Power BI tile. By creating a simple report and dashboard my Power App now has a fully functioning Power BI tile that will refresh on the same schedule as the main Power BI report within the service.
Hopefully from this blog you can see how powerful these two services can be when paired together but also how accessible these tools are now. The fact that I can have a working mobile app within minutes is somewhat revolutionary. I can certainly see a load of opportunities for these to be used and I encourage anyone reading this to have a play and unleash the POWER!

