Just a quick post here to help anyone who needs integrate their Azure Databricks cluster with Data Lake Store. This is not hard to do but there are a few steps so its worth recording them here in a quick and easy to follow form.
This assumes you have created your Databricks cluster and have created a data lake store you want to integrate with. If you haven’t created your cluster that’s described in a previous blog here which you may find useful.
The objective here is to create a mount point, a folder in the lake accessible from Databricks so we can read from and write to ADLS. Here this is done in notebooks in Databricks using Python but if Scala is your thing then its just as easy. To create the mount point you need to run the following command:-
configs = {“dfs.adls.oauth2.access.token.provider.type”: “ClientCredential”,
“dfs.adls.oauth2.client.id”: “{YOUR SERVICE CLIENT ID}”,
“dfs.adls.oauth2.credential”: “{YOUR SERVICE CREDENTIALS}”,
“dfs.adls.oauth2.refresh.url”: “https://login.microsoftonline.com/{YOUR DIRECTORY ID}/oauth2/token”}
dbutils.fs.mount(
source = “adl://{YOUR DATA LAKE STORE ACCOUNT NAME}.azuredatalakestore.net{YOUR DIRECTORY NAME}”,
mount_point = “{mountPointPath}”,
extra_configs = configs)
So to do this we need to collect together the values to use for
- {YOUR SERVICE CLIENT ID}
- {YOUR SERVICE CREDENTIALS}
- {YOUR DIRECTORY ID}
- {YOUR DATA LAKE STORE ACCOUNT NAME}
- {YOUR DIRECTORY NAME}
- {mountPointPath}
First the easy ones, my data lake store is called “pythonregression” and I want the folder I am going to use to be ‘/mnt/python’, these are just my choices.
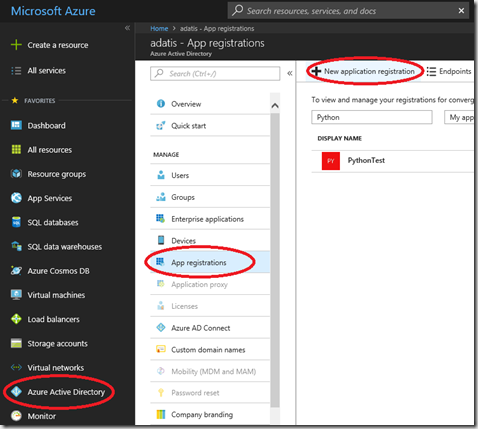
I need the service client id and credentials, for this I will create a new Application Registration by going to the Active Directory blade in the Azure portal and clicking on “New Application Registration”
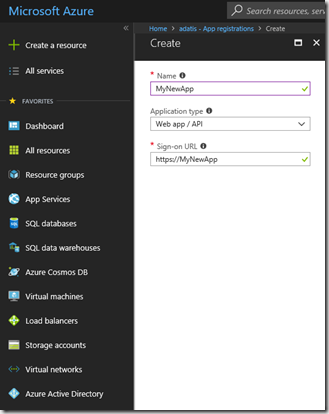
Fill in you chosen App name, here I have used the name ‘MyNewApp’, I know not really original. Then press ‘Create’ to create the App registration
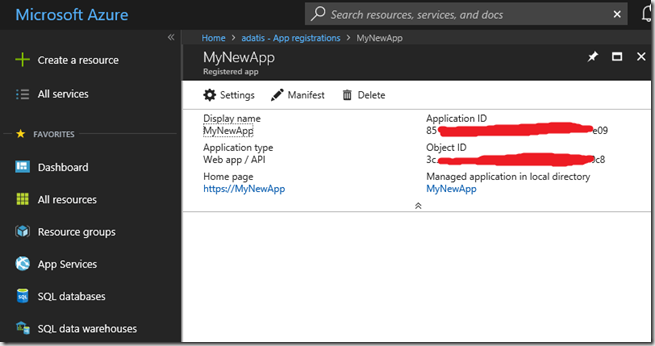
This will only take a few seconds to create and you should then see your App registration in the list of available apps. Click on the App you have created to see the details which will look something like this:
Make a note of the ApplicationId GUID (partially deleted here), this is the SERVICE CLIENT ID you will need. Then from this screen click the “Settings” button and then the “Keys” link. We are going to create a key specifically for the purpose. Enter a Key Description, choose a Duration from the drop down and when you hit “Save” a key will be produced. Save this key, its the value you need for YOUR SERVICE CREDENTIALS and as soon as you leave the blade it will disappear.
We now have everything we need except the DIRECTORY ID.
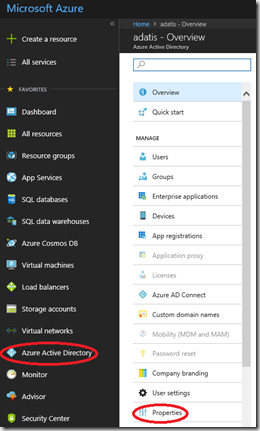
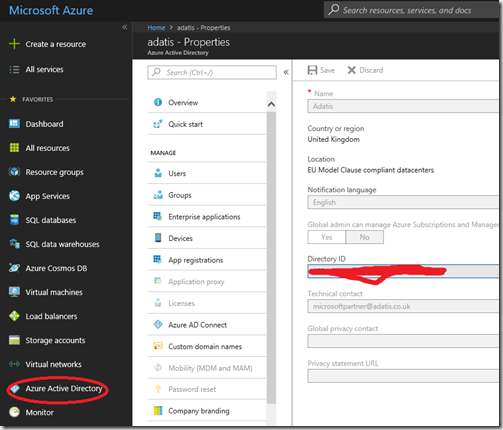
To get the DIRECTORY ID go back to the Active Directory blade and click on “Properties” as shown below:-
From here you can get the DIRECTORY ID
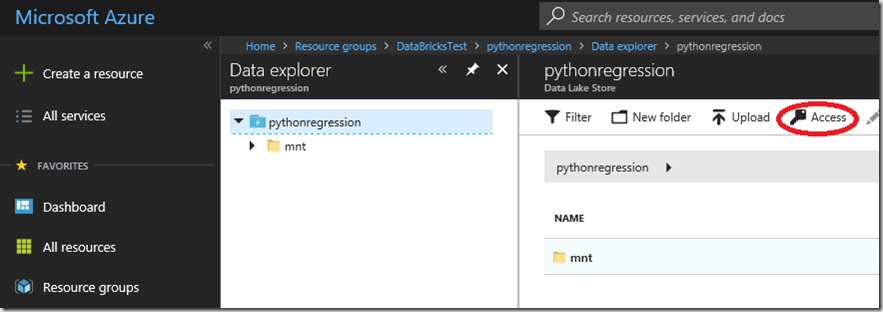
Ok, one last thing to do. You need to grant access to the “MyNewApp” App to the Data Lake Store, otherwise you will get access forbidden messages when you try to access ADLS from Databricks. This can be done from Data Explorer in ADLS using the link highlighted below.
Now we have everything we need to mount the drive. In Databricks launch a workspace then create a new notebook (as described in my previous post).
Run the command we put together above in the python notebook
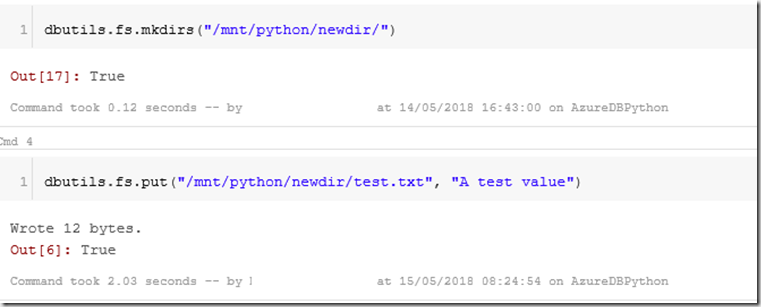
You can then create directories and files in the lake from within your databricks notebook
If you want to you can unmount the drive using the following command
Something to note. If you Terminate the cluster (terminate meaning shutdown) you can restart the cluster and the mounted folder will still be available to you, it doesn’t need to be remounted.
You can access the file system from Python as follows:
with open(“/dbfs/mnt/python/newdir/iris_labels.txt”, “w”) as outfile:
and then write to the file in ADLS as if it was a local file system.
Ok, that was more detailed than I intended when I started, but I hope that was interesting and helpful.

