Microsoft Azure Databricks is Microsoft’s Apache Spark-based platform optimised for Azure and thus integration with Power BI. It was released on 26th of February this year and is still in preview but in our recent project we decided to give it a go and explore what options would such a solution behold for an enterprise data warehouse solution.
To do so we have created a cluster for our project with some notepads with a PySpark script that does all our ETL. On top of that we have decided to use Power BI to feed directly from the Databricks cluster tables to build our dataset and reports.
With this blog post I am going to take you through the quick process of setting up the Databricks connection in Power BI desktop using the web app and the scheduled refresh.
The prerequisites for such a task are:
- Azure Databricks cluster with data tables (Facts, Dimensions, etc.)
- An access Databricks token (not the same as Azure tokens)
- Power BI subscription (I’m working with Pro version)
- Power BI Desktop
And that’s all – no gateways, no drivers, no batteries needed.
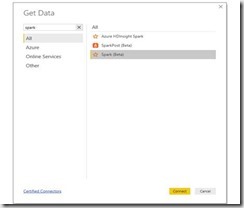
1. Firstly, we need to make sure we have started our cluster as this takes approximately 5-10 mins. If we have already created our token (non-expiring would be ideal) and saved it somewhere we just need to open Power BI desktop and select Get Data from the welcoming screen.
If you try to filter by Spark on all the connectors options you will notice there are currently three options, we will use “Spark (Beta)” one and click Connect:
2. The next step is a bit trickier as you need the URL address of your cluster (and from now on we need it to be started). To compose the above-mentioned address open Databricks, go to Clusters and select the cluster you want to connect to.
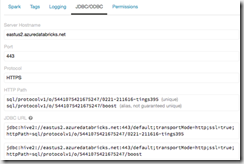
On the cluster edit page, scroll down and select the JDBC/ODBC tab.
On the JDBC/ODBC tab, copy and save the JDBC URL.
Construct the JDBC server address that you will use when you set up your Spark cluster connection in Power BI Desktop.
Take the JDBC URL that you copied and saved in step 3 and do the following:
? Replace jdbc:hive2 with https.
? Remove everything in the path between the port number (443) and sql (sql/protocol…) whilst keeping the boxed text as per the image below:.
In our example, the server address would be:
https://eastus2.azuredatabricks.net:443/sql/protocolv1/o/5441075421675247/0221-211616-tings395
or https://eastus2.azuredatabricks.net:443/sql/protocolv1/o/5441075421675247/boost
(if you choose the aliased version)
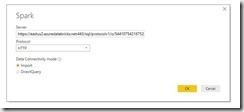
Once you have the address you need to input under the Server label in the dialog box of the next setup step:
Please note that the Protocol must be HTTP. As per the Data Connectivity mode – both are supported so it is up to your personal / business preference.
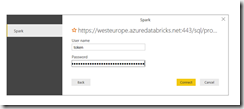
3. The next step will be to input your login details.
Please keep in mind this is although this is a bit misleading as for User name you need to input “token” and for Password – the token string value you have previously saved (or if you forgot to save it just go create a new one as I did a couple of times )
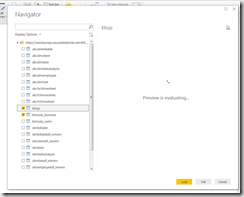
4. After you have successfully connected (if the cluster is Online you shouldn’t experience any issues) you will be able to select the data tables you need for your report and edit the queries to your liking. It is a ‘bit’ slow when compared to other data connectors but it is still in beta and hopefully it will be much more responsive in the near future.
5. Upon configuring your dataset, creating the report masterpiece of the day and publishing it online, comes the final touch of the report development – setting up the automatic dataset refresh from the Power BI web service:
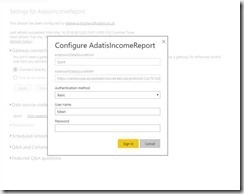
And here comes the sweetest part – as Power BI and Databricks are integrated and everything is in the cloud you don’t need gateways, ODBC drivers nor anything just setup the credentials once again as per the following image:
N.B. Whenever your cluster is offline you will see an error that your credentials are not valid :
For this to work as expected always start your Databricks cluster first and make sure it is online before your dataset refresh schedule hits!
However, there is a not-so-sweet part as well. I’d even say salty as the tears I cry whenever I need to fight this bug.
Currently once you deploy your dataset over a week or two the scheduled refresh starts failing with strange errors like “Bad request” or my favourite “Invalid method name: ‘GetCrossReference'” for which I have logged a bug with Microsoft.
This is manually fixed by opening your Power BI Desktop, click Edit Queries and refresh all the data tables one by one. If you get an error just try again – the Spark connector is a bit buggy and takes a while to fetch the data but once you have refreshed the data set and publish it your report will refresh smoothly (taking for granted your cluster is always online when you are refreshing the dataset) for at least a week .
As a conclusion, Power BI with Databricks is a tempting new option for cloud only based solution which even in preview is pretty stable and reliable, so just give it a go and let me know if you experience any bugs or if you discover something new and exciting about this connection of Power BI.

