In this blog, we attempt to create an Azure data warehouse solution in a week. Is it possible? Yes. It is possible to create a modern data warehouse solution in a week, albeit not with outstanding complexity and detail. This is not how we would do things for clients but should give you insight at a high-level of what we do.
Purposefully, this experiment was to prove the concept of modern data warehouse design and whether it can be done in a week. Moreover, this project shows how easy it is to use Azure, and with a bit of design you can create a Modern Data warehouse.
The four repeatable steps to creating a modern data warehouse solution are as follows:
1. Profile the data.
Learn from the data, understand it. Here you want to check for data quality issues, such as missing data, redundant data, or general data inaccuracies. Moreover, understand the relationships between the entities (Tables) and the grain of the tables. For this, we should take 100 rows of data in a table, copy the data of the table into a spreadsheet, and highlight any issues. Remember, this is not an extensive data quality assessment, the agile development of the solution should bring more issues to the surface.

2. BEAM!
For this step, we need BEAM (Business Event analysis and Modelling). Here, we need to match business processes to the data. Using seven pedagogical questions of Who, What, When, Where, Why, How and, How Many we can start to understand what may be in our fact tables and dimension tables. The example below shows a business event and the subsequent division of data into these questions. How many is a field in the fact table, and the rest are in the dimensions.
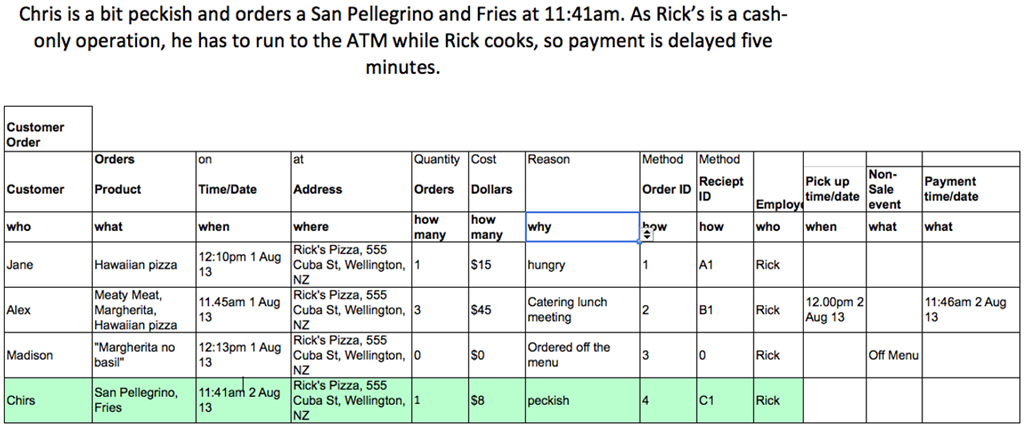

3. Draw your diagram
Use pen and paper if you need to, the purpose of this is to draw your tables and the relationships between them. Using the information in the BEAM session, you will need to create a star schema with your new dimension and fact tables. An example is below:

4. Start Mapping
Using excel spreadsheets, map your new target table columns to the source columns. For example, a customer name in your new dimension; Customer_Dimension previously existed as CstName in tblCustomers.

5. Create your skeletons
Go to the Azure portal, spin up an instance of SQL server. Connect to the SQL server with SQL Management Studio. Create a database called ‘Warehouse’ and four schemas ‘Stage’, ‘Clean’, ‘Dim’, and ‘Fct’. Create the solutions tables that match the source tables you are transforming in Stage and Clean. For clean have varchar (250) data values, and in clean have the values that are appropriate for your design, these should match the dimension and fact column values.
6. Use data bricks and PySpark to Extract, Transform and Load your data through the solution.
Load up an instance of data bricks and create a cluster. Then create separate notebooks for every table in the following categories ‘SourceToStage’, ‘StageToClean’, ‘CleanToWarehouse’.
Import pyspark SQL into your pyspark notebook.
from pyspark.sql.functions import *
from pyspark.sql.types import *
from pyspark.sql import *
SourceToStage
Define your data source
jdbcHostnameSource = "Sourceserver.database.windows.net"
jdbcDatabaseSource = "SourceSystemDataBase"
usernameSource = 'UserName123'
passwordSource = 'Password123'
jdbcPortSource = 1433
jdbcUrlSource = "jdbc:sqlserver://{0}:{1};database={2};user={3};password={4}".format(jdbcHostnameSource, jdbcPortSource, jdbcDatabaseSource, usernameSource, passwordSource)
connectionPropertiesSource = {
"user" : usernameSource,
"password" : passwordSource,
"driver" : "com.microsoft.sqlserver.jdbc.SQLServerDriver" }
Define your data target
jdbcHostnameTarget = "targetserver.database.windows.net"
jdbcDatabaseTarget = "Warehouse"
usernameTarget = 'Username123'
passwordTarget = 'Password123'
jdbcPortTarget = 1433
jdbcUrlTarget = "jdbc:sqlserver://{0}:{1};database={2};user={3};password={4}".format(jdbcHostnameTarget, jdbcPortTarget, jdbcDatabaseTarget, usernameTarget, passwordTarget)
connectionPropertiesTarget = {
"user" : usernameTarget,
"password" : passwordTarget,
"driver" : "com.microsoft.sqlserver.jdbc.SQLServerDriver" }
Create a temporary view from your source
df = spark.read.jdbc(url=jdbcUrlSource, table="Sales.Customers", properties=connectionPropertiesSource)
df.createOrReplaceTempView("source")
Create a temporary view ‘target’ as the temporary view ‘source’ using the following SQL statement – Here you want to bring every column in.
%sql
DROP TABLE IF EXISTS target;
CREATE TEMPORARY VIEW target
AS SELECT * FROM source;
Write to the new stage target table
spark.table("target").write.mode("append").jdbc(url=jdbcUrlTarget, table="Stage.Customers", properties=connectionPropertiesTarget)
StageToClean
The data source is now the warehouse database
jdbcHostnameSource = " Sourceserver.database.windows.net"
jdbcDatabaseSource = "Warehouse"
usernameSource = 'UserName123'
passwordSource = 'Password123'
jdbcPortSource = 1433
jdbcUrlSource = "jdbc:sqlserver://{0}:{1};database={2};user={3};password={4}".format(jdbcHostnameSource, jdbcPortSource, jdbcDatabaseSource, usernameSource, passwordSource)
connectionPropertiesSource = {
"user" : usernameSource,
"password" : passwordSource,
"driver" : "com.microsoft.sqlserver.jdbc.SQLServerDriver"}
Create a temporary view from your source
df = spark.read.jdbc(url=jdbcUrlSource, table="Stage.colors", properties=connectionPropertiesSource)
df.createOrReplaceTempView("source")
Create a temporary view ‘target’ as the temporary view ‘source’ using the following SQL statement, here you want to clean and manipulate columns as needed. Below I have changed and modified the ValidFrom and ValidTo column into dates.
%sql
DROP TABLE IF EXISTS target;
CREATE TEMPORARY VIEW target
AS SELECT
ColorID,
ColorName,
LastEditedBy,
CAST(ValidFrom as date) As ValidFrom,
CAST(ValidTo as date) As ValidTo
FROM source;
Write to your clean source table and then truncate the stage table
spark.table("target").write.mode("append").jdbc(url=jdbcUrlSource, table="clean.colors", properties=connectionPropertiesSource)
spark.table("Source").write.mode("overwrite").jdbc(url=jdbcUrlSource, table="stage.colors", properties=connectionPropertiesSource)
CleanToWarehouse
Define the data source
jdbcHostnameSource = " Sourceserver.database.windows.net"
jdbcDatabaseSource = "Warehouse"
usernameSource = 'UserName123'
passwordSource = 'Password123'
jdbcPortSource = 1433
jdbcUrlSource = "jdbc:sqlserver://{0}:{1};database={2};user={3};password={4}".format(jdbcHostnameSource, jdbcPortSource, jdbcDatabaseSource, usernameSource, passwordSource)
connectionPropertiesSource = {
"user" : usernameSource,
"password" : passwordSource,
"driver" : "com.microsoft.sqlserver.jdbc.SQLServerDriver"
}
Create a temporary view from the Clean table and the Dimension table
paymentmethods = spark.read.jdbc(url=jdbcUrlSource, table="dbo.paymentmethods", properties=connectionPropertiesSource)
paymentmethods.createOrReplaceTempView("paymentmethods")
dimpaymentmethod = spark.read.jdbc(url=jdbcUrlTarget, table="dim.paymentmethod", properties=connectionPropertiesTarget)
dimpaymentmethod.createOrReplaceTempView("dimpaymentmethod")
Create your script to insert into your target table
%sql
DROP TABLE IF EXISTS target;
CREATE TEMPORARY VIEW target
AS SELECT DISTINCT
p.PaymentMethodName as PaymentMethodName
FROM PaymentMethods p
WHERE NOT EXISTS (SELECT PaymentMethodName FROM dimpaymentmethod );
Write the target table to the Warehouse
spark.table("target").write.mode("append").jdbc(url=jdbcUrlTarget, table="dim.paymentmethod", properties=connectionPropertiesTarget)
7. Orchestrate using Azure Data Factory
To orchestrate your solution, use Azure Data Factory. Once you’ve spun up an instance of Azure data factory place your data bricks notebooks inside pipelines. Then order your pipelines in the following order: SourceToStage, StageToClean , Dimensions, Facts, and TruncateClean. It’s important to load the dimension tables before the fact tables and then following up with a truncation of clean.
