Data Extraction
Objectives
- Provision Azure resources based on our reference architecture diagram.
- Create and configure Azure Logic App
- Land API Responses in Azure Blob Storage
At this point we’ve completed the Data Exploration step and have understood how the data is structured, formatted, as well as the API’s query parameters and configuration settings. We also ran a few GET requests. If you haven’t read Part 1 – Data Exploration, please do so before proceeding.
Provision Azure resources
Once built and tested, our GET request can now be implemented using Logic Apps. Before proceeding, we first need to create a resource group and deploy the below resources.
Remember to create a blob storage container within the storage account, this is where the JSON files will land. A Basic database (2 GB Storage/ 5 DTUs ) will suffice for the purposes of our exercise to keep the costs under control.
Azure Logic App
I’ll start by selecting a trigger event. I’ll set the frequency to once a day. That said, you can always trigger the Logic App manually especially for debugging purposes.
In the next step, I’ll initialize an integer variable which I’ll name “currentPage”. It will be used within the Loop statement.
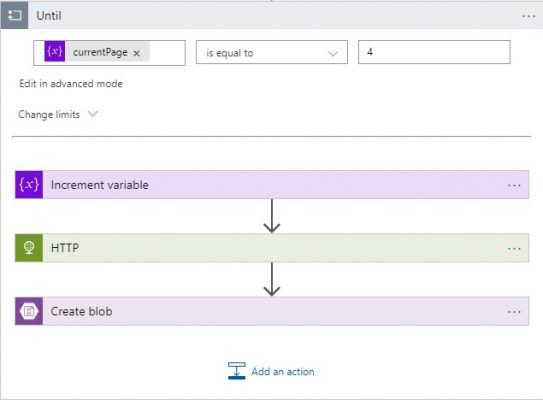
In the next step, I’ll add a “Until Loop” statement which I’ll set to loop 4 times (amend to suit your needs).
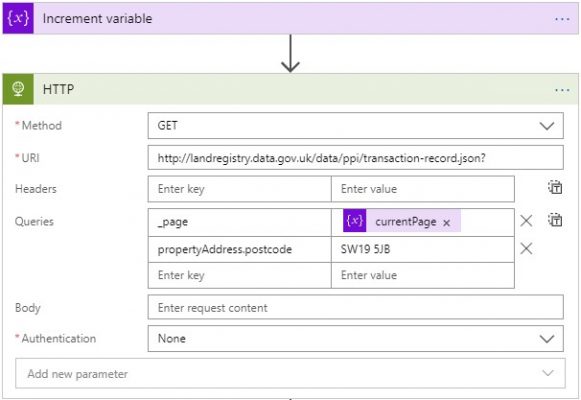
Each time the Logic App loops, the “currentPage” variable is incremented by 1. The value is then passed to the “_page” query parameter.
Notice, I’ve specified the postcode without using “%20”, it appears Logic Apps can handle spaces better than Postman.
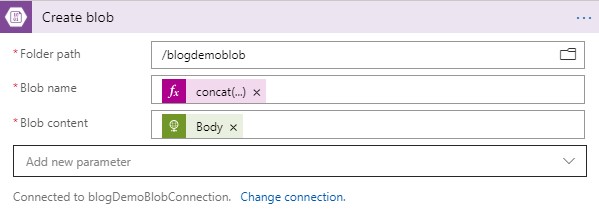
I’ll then tell Logic Apps to dump the JSON Document into the Blob Storage container. I’ll give each blob a unique name using the formula: concat('PricePaidDatasetDump_',variables('currentPage')).
Lastly, I’ll specify the HTTP Response Body as the Blob content.
After amending the Logic App, slightly, I re-ran it for the second postcode near Twickenham Rugby Stadium. In the end I have a combined total of 6 files in my blob storage container.
Summary
In this blog, I’ve provisioned all the necessary Azure resources based on the architecture outlined in Part 1 of the blog series. I’ve made use of the Logic App and the Blob Storage container within this blog. If you’ve followed along, you should have a list of unique files within the blog storage container holding JSON data from the API Call Response. In the third and final blog, I’ll ingest the files into Azure SQL DB and begin the data transformation process.
A few things to bear in mind, particularly for more data intensive API requests. It might be worth adding a delay within the loop to avoid exceeding usage limits. In addition, it might help to configure the “Count” and “Timeout” settings within the loop. The setting helps keep the Logic App active while the loop-continuation condition remains true.


